|

<<< Continued from previous page A few other tools, all self-explanatory, will make your work easier: sharp scissors; a metal ruler (12" to 18"); long, small-gauge knitting needles (size 4 or 5); a roll of wax paper; and a brick or two. No, not to throw in case of frustration. Bricks covered in paper and used in combination with small, thin square boards make great weights in lieu of a bookbinding press. A few other helpful items are a trash can (or a bag taped to the edge of your worktable), scrap paper, a dishcloth (kept damp, it's great for wiping glue off of fingers), and a jar of water for brushes. Eager to do those first repairs? Great! Let's start with something easy: torn pages and loose bindings. And now is a good time to state the cardinal rule of book repair: first, do no harm. The last thing you want to do is make a damaged book worse. This rule often gets broken when people make a repair that is actually stronger than the material they're fixing - the "Duct Tape School of Book Repair," if you will. Please, stifle the urge to whip out the cellophane tape too. Fixing a torn page sounds like a no-brainer, but here are a few tips that will ensure a good repair. Make sure your hands are absolutely clean or you'll tape a fingerprint right onto the page. Make sure the type lines up if the tear goes through the printing. Use self-adhesive paper tape on newer books only, and gently burnish the tape with your bone folder's rounded edge (or, in a pinch, you can use the bowl of a spoon). For older books with more delicate pages, use a needle and your ruler to cut a strip of rice paper slightly larger than the tear. Don't press too hard. You'll want to cut through just enough to allow you to tear the strip. This will give you nice, long, blendable fibers at the edges. Put a sheet of wax paper behind the page to be repaired, then, using your methylcellulose as glue, brush the strip and place it over the tear. Let dry. The paper will dry nearly transparent. Next, another easy repair - loose hinges. Stand your book on its tail and gently pull back on the boards in order to open the space where the hinge has loosened. Take one of your knitting needles and coat it with PVA. Ease the needle down into the hinge area between the backbone of the book and the spine.
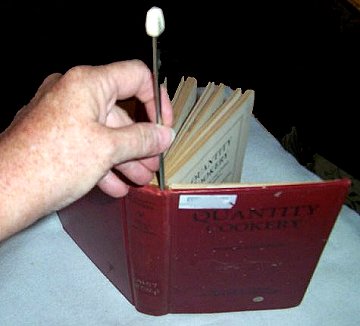
Roll the needle a few times to coat the hinge area. Make sure you get the glue only into this area or the book will not be able to open properly when dry. Repeat on the other side. Close the book and lay it on its side. Gently run the side of your bone folder in the joint then flip the book over and do the same with the other side. You'll want to keep the shape of those nicely formed hinges, so clean off the glue from your knitting needle and place one into one joint and a second into the other. Finally, place the book under a weight to dry. PVA dries quickly (15-30 minutes), so in no time at all you'll have a book with a nice, tight binding again. There are a number of good sources for equipment and materials, but here are a few of my favorites with their web addresses. Most sites will allow you to order a paper catalog if you prefer.
Brodart
< to previous article
Questions or comments?
| Forum
| Store
| Publications
| BookLinks
| BookSearch
| BookTopics
| Archives
| Advertise
| AboutUs
| ContactUs
| Search Site
| Site Map
| Google Site Map
Store - Specials
| BookHunt
| BookShelf
| Gold Edition & BookThink's Quarterly Market Report
| DomainsForSale
| BookThinker newsletter - free
Copyright 2003-2011 by BookThink LLC
|

|